Before a user can use Mobile Identity to log in to your website, they will need to enrol an authentication device. In this scenario you will see how to add this enrolment to your already existing user registration process.
How does it work?
For this scenario, let's assume that you already have a way for a user to sign up on your website. Typically, this involves the user providing a username or email address. You might have additional steps after that, but for Mobile Identity, that's of little consequence. For the sake of this explanation, let's assume the registration process looks like this.
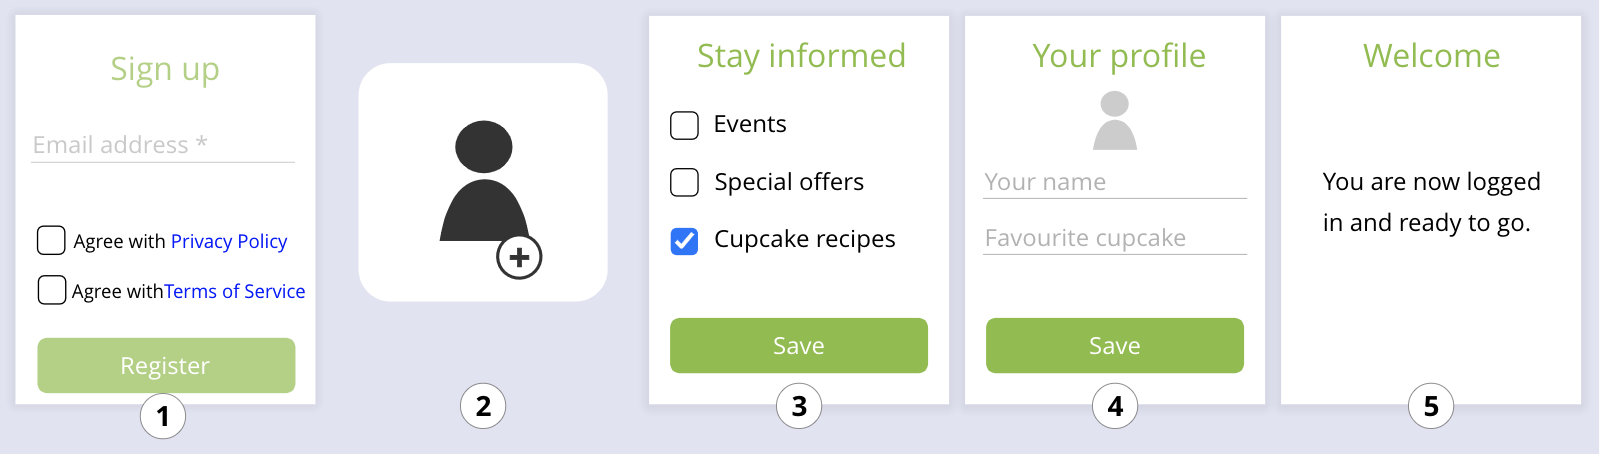
- The user enters a username.
- You create a new account for the user.
- The user indicates their notification preferences.
- The user fills out their profile.
- You take the user to the welcome page.
Your registration process may consist of only the first two steps, or it may have steps not mentioned here, or it may have these steps in a different order. It doesn't matter. As long as you create an account for the user, this will work.
You can insert the Mobile Identity enrolment anywhere into the process after the account has been created. Here's what that looks like.
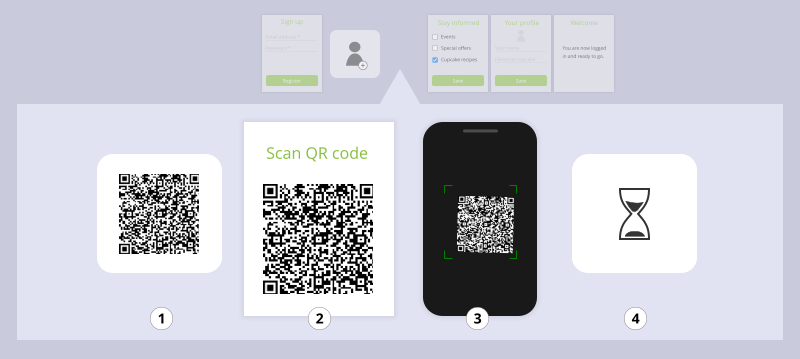
- You generate a QR code.
- You show the QR code to the user.
- The user scans the QR code with the device they want to use as their authentication device.
- You wait until the user has scanned the QR code.
What parts of the API do you need?
- POST /auth/oauth2.0/v1/access_token to obtain an access token.
- POST /omi/qr/enrol to generate a QR code.
- GET /omi/qr/enrol/status to check if the user has scanned the QR code.
Step by step
Where to start?
You will need to decide where in your registration process you will ask the user to enrol their authentication device. The rule to keep in mind: you must create an account for the user before you can show them a QR code since you need the UUID as a reference in later steps.
This means, you first need to ask the user for a username and create their account. After that, you can put the enrolment process wherever you like.
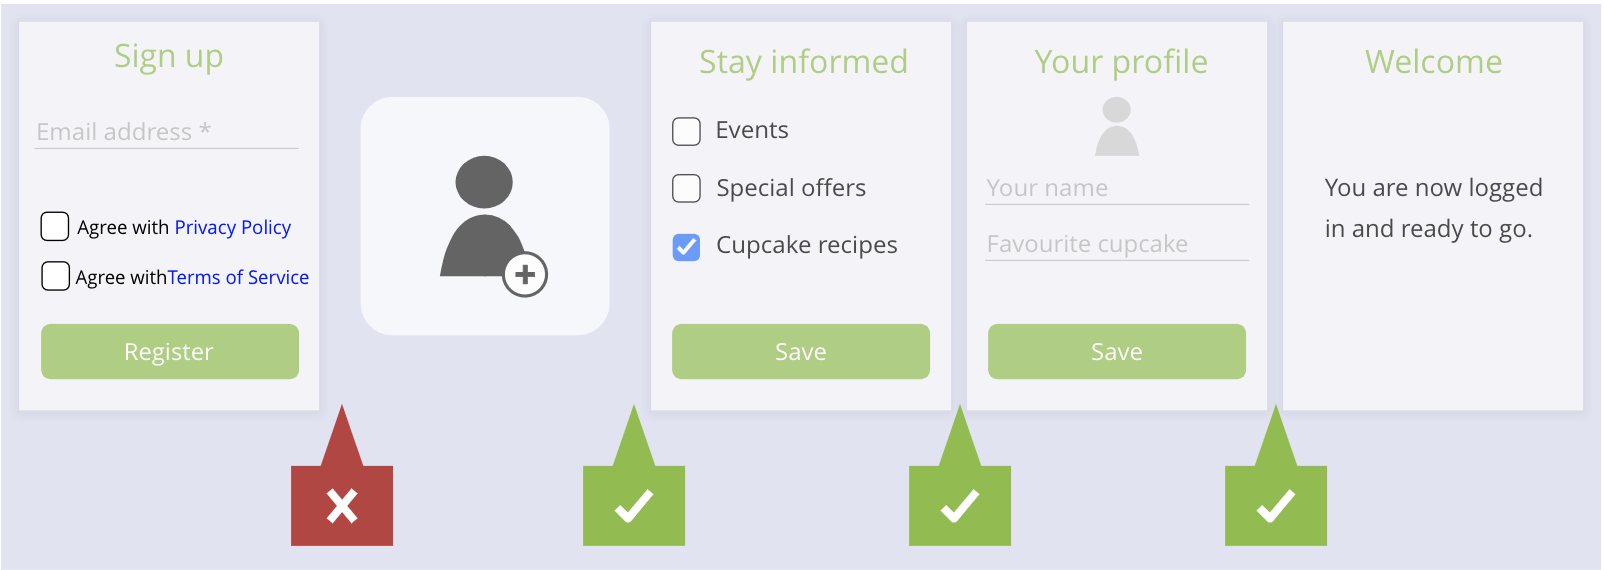
Of course, if you don't have any extra steps in your registration process, then the only possibility is: create an account, then enrol a device.
Obtain an access token
In order to call the Mobile Identity endpoints, you need to obtain an access token. If you want to know how to obtain an access token, please consult this page.
You need to specify the scopes of the access token or you won't be able to call the necessary endpoints. In this case, you need the following two:
- credential:omi:enrol:qr:admin:post
- credential:omi:enrol:status:get
Now, you may ask yourself: why do I need an access token if I want to use these APIs for doing a registration flow? Well, you need an access token with the above scopes so that we know that the application which is doing these calls is a trusted application. With this context in mind, we recommend you to use the oauth2 client credentials flow.
Generate a QR code
Before you can show a QR code to your user, you'll have to generate it, using the /omi/qr/enrol endpoint. The response of this API, as the API specification states, returns the QR code as a base64-encoded PNG image. You can show this on a webpage using the <img>-element. Just put the entire value in the src-attribute, prefixed with data:image/png;base64,.
<img src="data:image/png;base64,iVBORw0KGgoAAAANSUhEUgAAAJYAAACWCAIAAACzY+a1AAAAAXNSR0IArs4c6QAAAARnQU1BAACxjwv8YQUAAAAJcEhZcwAADsMAAA7DAcdvqGQAAAqLSURBVHhe7ZuxblVLD4Uvf49CKKh4AQqk1BQkDRXvmFegoUVKJNKi0CFBFVFRIPIE+Q32cQavscf75FzpWvJX7fEsr/Fmti2FwKN/HsDd3Z08AY8e/XYOBAinIGiiSt1aRjzzkcCNCU5Rgi3GeI5kikQk5+jo6OTkhJ+XXF9f397e0sOymkCA5N9Zlfjn5UU885HAjQlOUYItxniOcMrWu5Cn09NTsk5CYs6S9VCTrHcRWYSwMoMkbESStyCZ8Ba8TCI5OyQ6IBsDHN96F//jtKYu0ux0mRcXF/Tw9evXjx8/ctDw9u3bZ8+e0cPZ2dnl5SU90FfwZ8edMLoM8AYOknFD8v6K9xabrEy1mIuvwxq9i5ubmw8fPvzZsbx58+b58+f0QHfBkfvmPT8/lxBwdXXFGhJzhJcjHCemyxHZGLZkPRN7SMKAbMy2GNkOcz1EN0MUibeQ7ZmA43oX79694wjy/v171pC4B2l5DnOFNAEY/jQIjsvi7k62h2EiG7MtWe+Q6AyxGJCcoRJGEmaIwteIY1iJKHyNbA+FyTq0zdBdWJ6+wvIc5gplNOw1HCRzyxyTdW6yMRINB5qH6IYKZT0gGwOS7BcpmeGQz9BdWJ6+wvJIm+uPkz9+/Pj27RsHDS9fvnz8+DE95H+0V4JxEY8aefoDKtEWKzEEAtziiFlOQY3xD85VWKN38fPnzy9fvvzZsbx48eL4+JgeJj/aZyAxZ8l6qEnWUKVEZ4hihih2SHRANgZkwz9RtnO50+UUUfj+Ep2dq7Bg6130IC2POxky0FfADzglOLIUEP99kz1SiIeYbKK7sDx9heX5/XOrPB4UMxOC6bFkU8pSjIJ/qSSj2eOUJN2F5ekrLI90dwacPHk2TY/lzEHBQUpa2mI8iHhkcr3IVNBdWJ6+wvJIPxLapAZsakW3lKWJMp0J/KBgFuOdQuxR0kHOVbwCMscF/qyZCroLy9NXWJ7Jj/bLMZKfCagMchEWbzpXyfgzQa4pQAkq8cgUv9zSpULx7sLyPOgv2PCjMATm0w9Knv5meQqhueazJTLpDBbAuV58JKMxYIqCb8FMPbsLy9NXWJ77xvT6ejkQCM1dToClkjBbmQIC0D+POTooPhPxCF7QuE2tugvL01dYHreFlcxkCEaBB9oqxj8zZxTPDYsPIgY8RQlqMwSnBCUpvDWNdxeWp6+wPOs54DU1gVsKjos8ZrCYJYERZGmiLP11qWTONXjmxCZ/ZkzpLixPX2F57hvWmwABy+GAA8FTjnhjBHMfQsbN1JZR5mvDF1eWfwIj3YXl6Sssz/0vm7R5OYK97CmJIJJHcxVjshQQywLQRFnWHBSwacuwPJcITLoLy9NXWJ4D/7eY/PRAvHmSmVHBLFpWEriZ3IzSq2RZxohnOz23u7A8fYXlcQdpZkR4uYTX+MoeW8FxCrox6JkpwOCZjyxzg0qUzEFKd2F59vmnwA8BzYOvkiObPlLPLUhB8ERmj3MJk+WZj3gmU8/uwvL0FZbHHaRBv2ObI0sTZek2Dg1Dxt8j8xZMUACyR0noryaZIrsLy9NXWJ77FsbmZYIWxjY3kUCABActWVYScNhcRbeWLE9BRvPuwvL0FZbH/ZVvQH56ZMxNyogRozLvj3ElsGWCCpW8f77mEdZMK+kuLE9fYXncQTrtWSYYBSbLixOBiWEpIIJKOIIFZDAnBiZY2/LETa9jGAXdheXpKyzPhl82bSKYEks2jRF+UB5S/NJNBVhAJsLsV6FnQvHuwvL0FZZnMkgN3kAYyWgYVAa5umXIKL1KMgWYCAqUIFcxWUvBiBFPC+guLE9fYXlsUxPcrUG/61YmYsBRgJjc4BQFjzNZy8JGNokZLElZmuBxXgQFRHdhee4/EPMd4bdjBCPTr4MITDL+qGHQJIgYPE/CS1E21YwleQTnGjc0J7oLy9NXWJ5Jj5uefQjBiEDwxGB6GB5S7R62mOIVj+xXalBkd2F5+grLs/63M5kR4eUqS8EUc/SyVGKPgzDFnKtkPDGXs7z4SKDhrWkB3YXl6Sssz2RiLMeF9nug9BofZwXiTQ88N1MJk1cGYPHoFhTJePERr8hpSndhefoKy3PfmMvGR/YYGkFEMSaKdwqROYjJmCisyZh7uZsIamOmp3QXlqevsDzrf4QYCLDxTQQFAQepxONfKkBBfxXzViY3KCBI7y4sT19hee7b32vVTW2uEUMwB5R87qaSmE0pJpLJVdDEI6PEE5mxpO7C8tzf//LCEUxZfnpK5hs0YEo+goIMy9rybpkClhqsh5TdheXpKyzP+n/5egIC+1pRjUfG3yNzrtGgJ5osK8H4pgjjxWOCSroLy9NXWJ71IA3wcollekapGgMep+QrCXIV1nhxIthSWBMcl68EIWV3YXn6Csuz/l++GbDxDXrKHtMDUwITJaPxyOcGSt1aknkv3prGuwvL01dYHvdXvkF3a0TxTJC8kjDi4Ny8iZJJYU1wimeeIfM6xn+a0l1Ynr7C8kx+tGe8OGG6m0ANs8nEQ3ODlEDDW5tyTbUY3y/CaFxZphC8NVV2F5anr7A860GKeG0+ghomsFVwXBhQEJT08ErQCnOXBQQmQcSA5xLdheXpKyzPvGFHgn5Xgi0GJ8MmW4N3ChEc5JGpjclXGOCZE8EWgwKKdBeWZ3LbfNWZ72v5QY0fCz94yhGjwVxMUZaaTSXhlgFP8QrInKugLTM17y4sT19hefb5uVDxhsYmliY4cLyaR4wmk6IsK0E3L4XwTtyjpKmyu7A8fYXlcf/tTDAisJ29meCZxzzEZDpqpmRsvUo07r34iHdQvlRlelx3YXn6CsvjDtJNLAcLxj3lyLK2wM3LzaR4JaGnpwzIl0oY/6myu7A8fYXl2TwHRvaYPEowgowtnrJHBAUBB8lVllno70XQiuLdheWRWz06Ojo5OeHnJdfX17e3t/SAH4tBBUjwbRpbPGWPCAoCDpKrLLPQ34ug1f1xp6entEhCYs6StQ/LRmQjRKQ7JDogGwOyMWzJGpDtEJHuxLIY4Dgh6xCR+ohuhih2SPTveA/S8khjUmNdXFzQw83NzadPnzhoeP369dOnT+nh7Ozs8vKSHszngESN72OyMCWwNZMHwVzEuAUFeKeMLE8MTEyuKewvdJCen59LCLi6umINDlJejsjGDomGiHRANnZIdEA2wko8JCHEU3KckPUsskQSckjOjB6k5ekrLM+Br1B6++6OhvVkXs+QhF3KiBHwkpDtR7//gpeRjb0QrwHZ2CHRIS6nDjXLxsyNke0Z4jVDFDtbWfxNd2F5DnyF/LEQ5iPi5RRJ8L9T2Z41gaxniGKnkcWAmO7VypI55C6RhNlrysaAbPiI7o+yu7A8fYXlkZ7VH+2/f//++fNnDhpevXp1fHxMD/ijPXd0QKDELY14BMd5bmgeVKKwxosT+a0gJcOykof+HSkvA0Q3U8rGsCVrH9HNEAW4ySJXiRLHCVkPyAZsSXSWksHLpWAP0vJIGz558mTTL5t+/fpFD/wVEPftvEJTkKVJkKt4JpirynxJ+L4YUTLVLsm8zlyRJHgBj+DFliaZP5TMOzOqzJeE74sRJVPtkvXr/PPP/wGmzRo8zvXsBQAAAABJRU5ErkJggg==">Check the status
Now it's up to the user to scan the QR code you're showing them. You can find out if they've done so by polling the endpoint /omi/qr/enrol/status. We recommend you poll every second or two, so you can act on the user's response quickly without overloading the servers.