Your website may include sensitive features, like viewing personal data or changing payment methods. Features like these could use some extra security measure, even when the user is logged in. In this scenario, you will see how to send a push notification to the user's authentication device, through which they can prove it's really them.
How does it work?
For this scenario, let's assume the user has enrolled an authentication device and that they're logged in to your website. The user wants to access a sensitive feature, for example they want to change their payment method. The process will look like this.
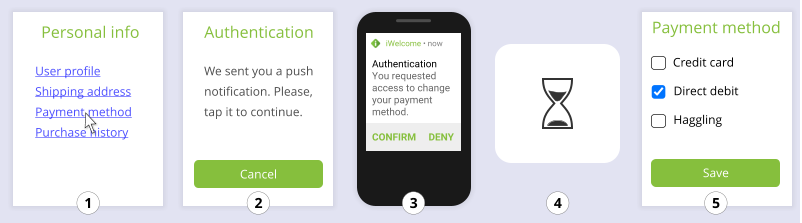
- The user accesses a sensitive feature.
- You send a push notification and ask the user to confirm.
- The user receives the notification and confirms.
- You wait for the user to confirm.
- You redirect the user to the requested page.
If you want to send the push notification to a specific device, there's an extra step to the process.
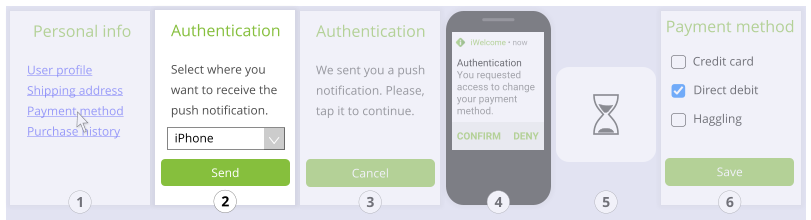
- The user accesses a sensitive feature.
- You ask the user which authentication device they want to use.
- You send a push notification and ask the user to confirm.
- The user receives the notification and confirms.
- You wait for the user to confirm.
- You redirect the user to the requested page.
What parts of the API do you need?
If you want to send a push notification to a specific device.
- GET /omi/users/{userId}/devices to retrieve a list of the user's devices.
- POST /omi/push/user/{userId}/device/{deviceId} to send a push notification to a specific device.
- GET /omi/push/confirmation to check if the user has confirmed the push notification.
Obtain an access token
In order to call the Mobile Identity endpoints, you need to obtain an access token. If you want to know how to obtain an access token, please consult this page.
If you want to send a push notification to a specific device, you need the following three scopes:
- credential:omi:devices:get
- credential:omi:push-notification:device:post
- credential:omi:push-notification:status:get
Send a notification to a specific device
If a user has enrolled multiple authentication devices, you can send your push notification to a specific one. Of course, you need to figure out which one first, so let's say you simply ask them. What you can do, is show a list of their authentication devices and have them pick one. To obtain this list, you can use the /omi/push/user/{userId}/device/{deviceId} endpoint.
Now that you know which authentication device to target, you can compose the push notification and then you can send it using the /omi/push/user/{userId}/device/{deviceId} endpoint. You'll need to provide the content of the push notification which consist on only one part, which is message.
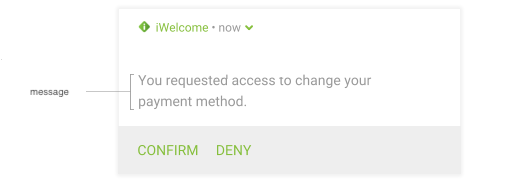
- Message. represents the message that will be displayed on the push notification on user’s device.
With that information and the access token you obtained earlier, you can send the push notification.
Check for a response
Now it's up to the user to confirm the push notification you've sent them. You can find out if they've done so by polling the endpoint /omi/push/confirmation. We recommend you poll every second or two, so you can act on the user's response quickly without overloading the servers.
When checking the status, you need to provide the nonce that you generated when sending the push notification. This is how we know which user you are checking up on.
Once you receive confirmation that the user has confirmed the push notification, you're done and you can take different decisions based on this.