A comprehensive user management environment is a prerequisite for providing powerful delegation capabilities, as well as reliable support to consumers, in a time-effective manner.
RITM's users module is comprised of two sections, namely Management and Requests, dealing with user and request management.
Management
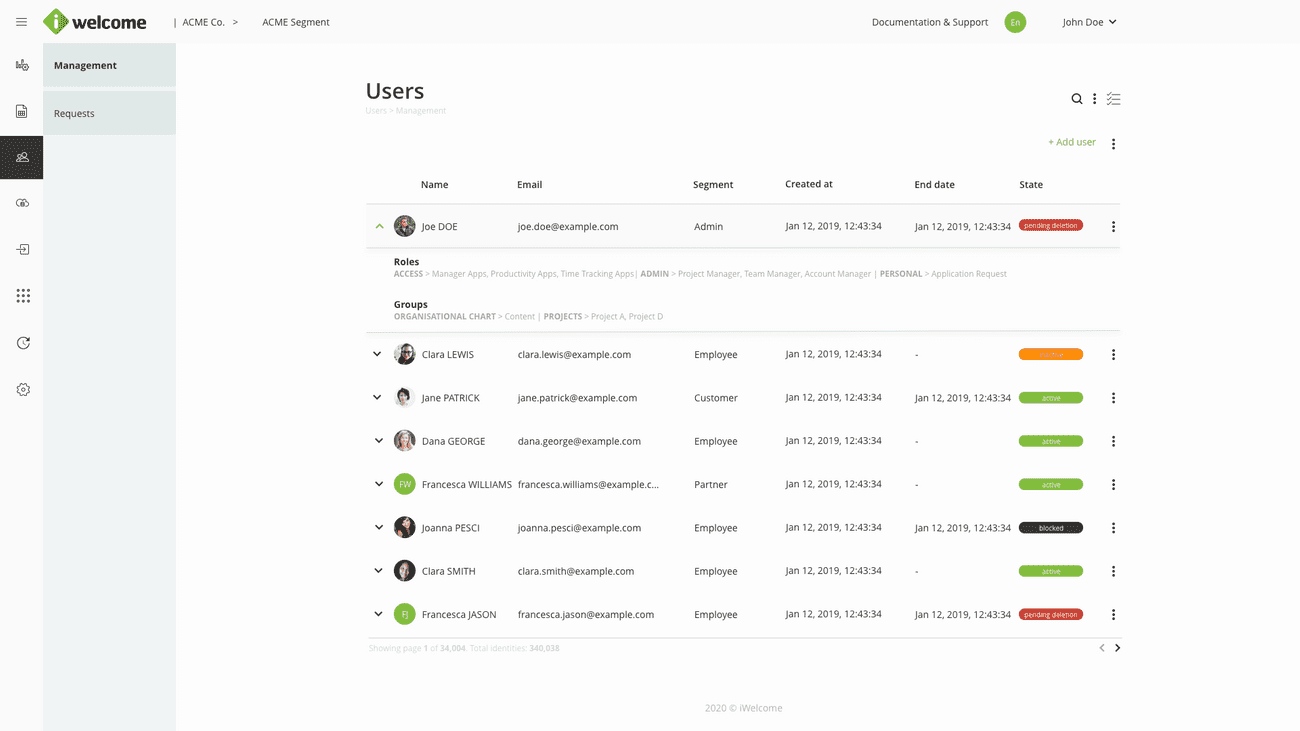
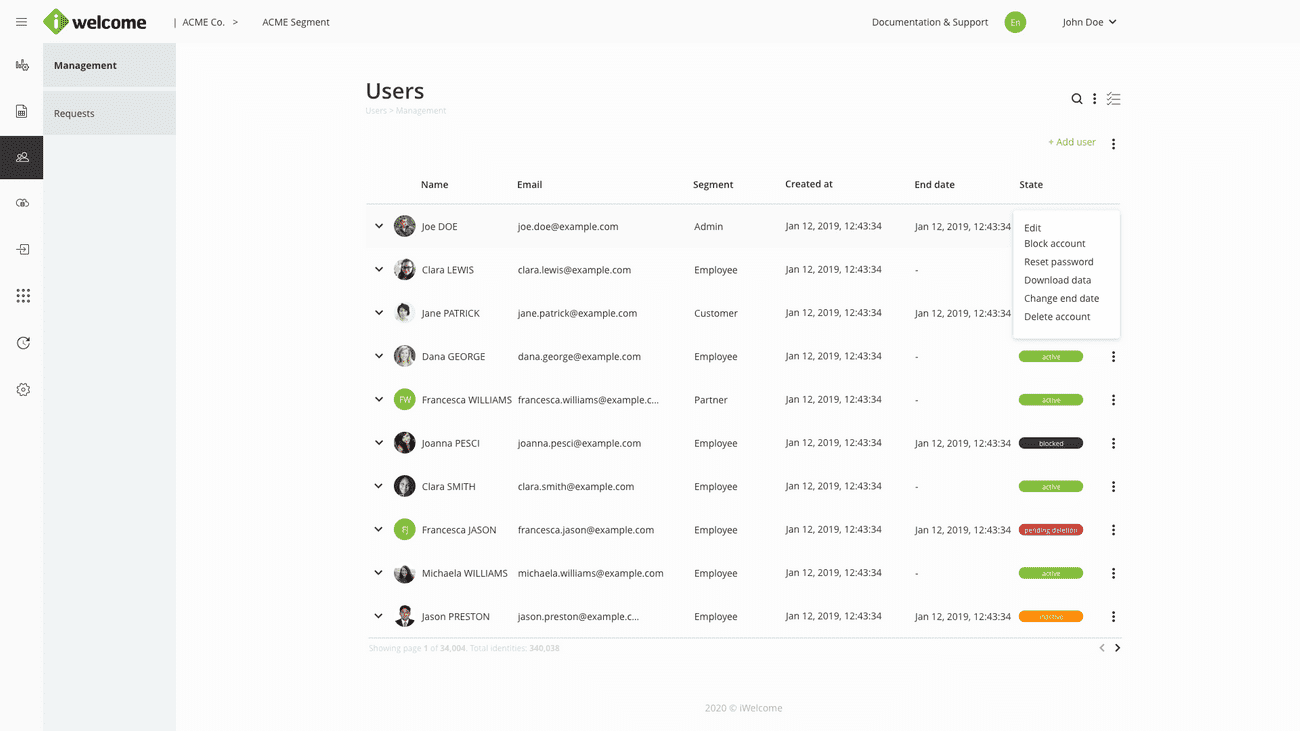
The Users section includes all the necessary tools for managing user accounts, whether one by one or in bulk, through mass updates and users' import.
Accessing users
A user is only able to access the Management menu item within the platform if that user has at least one Admin role that grants him that permission. Furthermore, users are only able to manage the identities belonging to the groups thet are allowed to manage, as configured in their admin roles. Therefore, user actions for each managed identity may difer based on the admin role entitlements.
Individual actions
Individual account management is possible with the help of:
- Account administration. You can activate, block, or delete a user's account. Additionally, you can set up an end date for the user's account, date at which it will be deactivated.

- Profile data management. Allows you to update a user's personal information to complete his profile data or rectify inaccurate data.

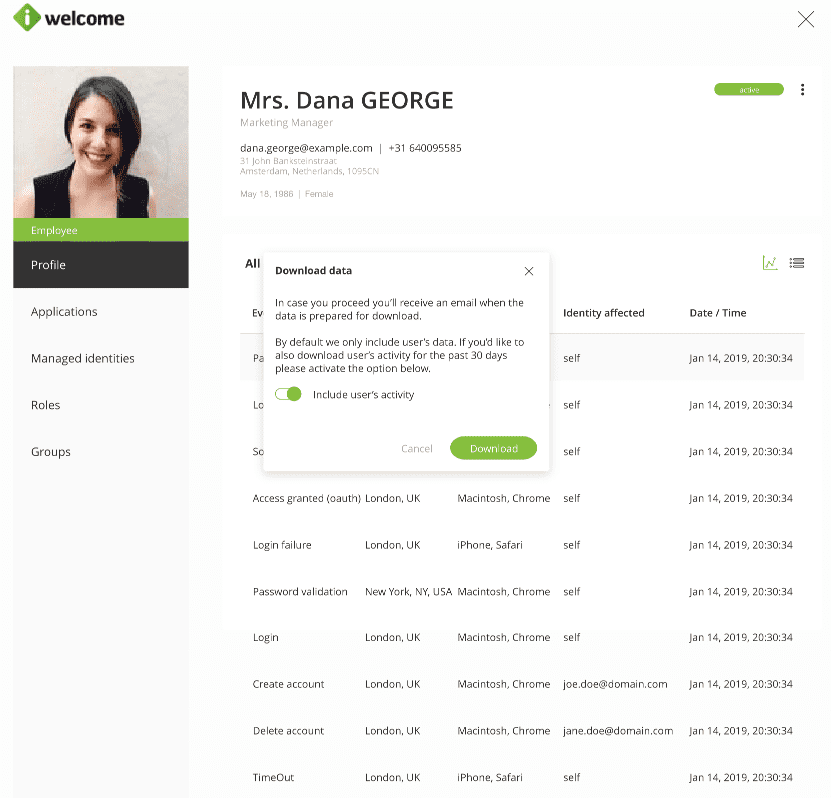
- User data download. Download all personal information related to a user. Optionally, you can include his activity for the past 30 days as well.
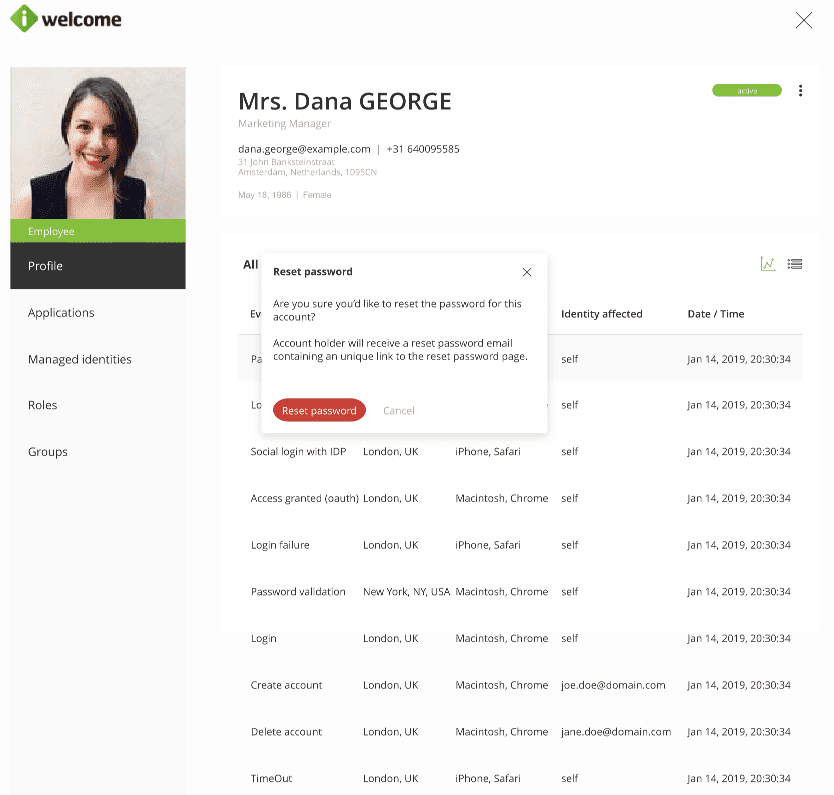
- Password reset. Help users regain access to their accounts by resetting their password. They'll receive a reset password email containing a unique link to the reset password page.
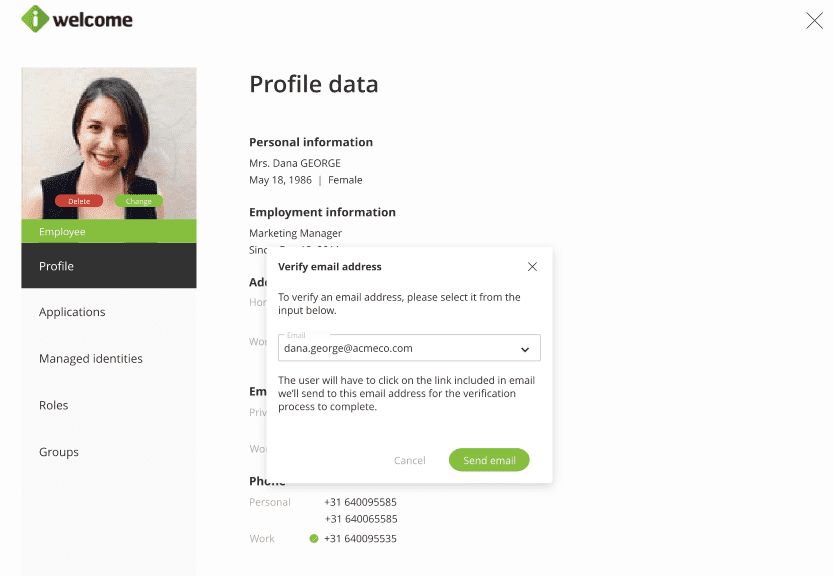
- Email address and phone verification. Verify a user's email or phone using a verification email that we send, or an SMS code sent to that phone number.
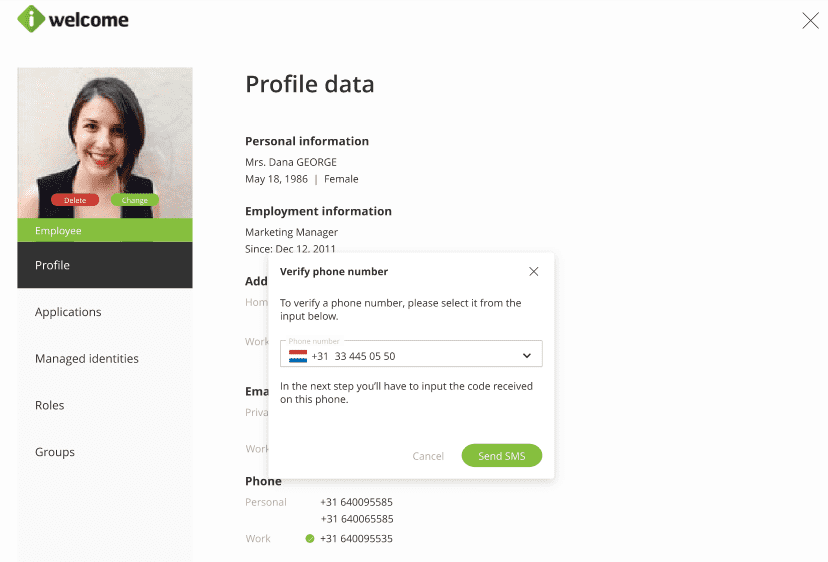
Email verification
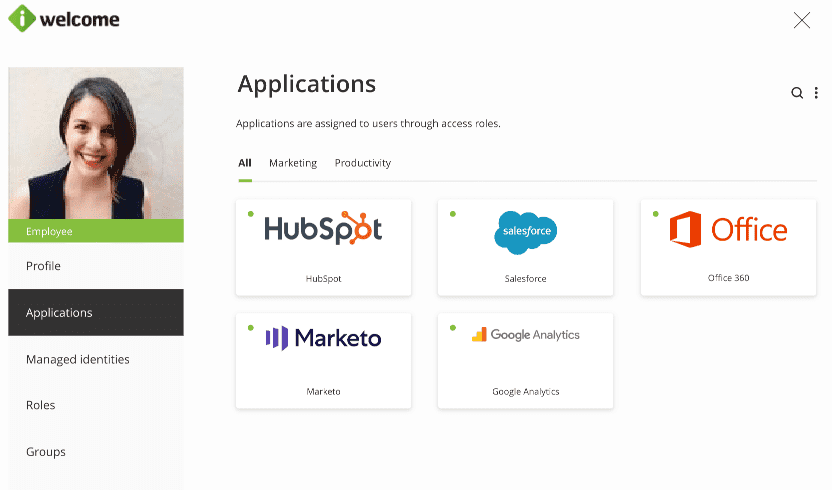
Assignation of applications to users through access roles. Grant users access to applications by assigning them with application roles within those applications.
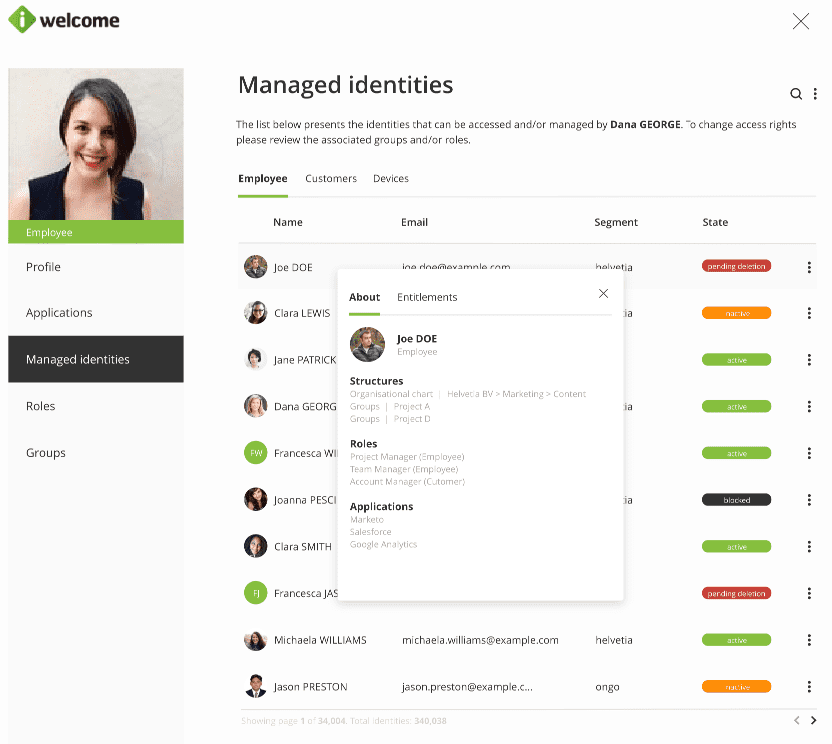
- Managed identities overview. Get an overview of all the identities that can be accessed and/or managed by that user and their entitlements.
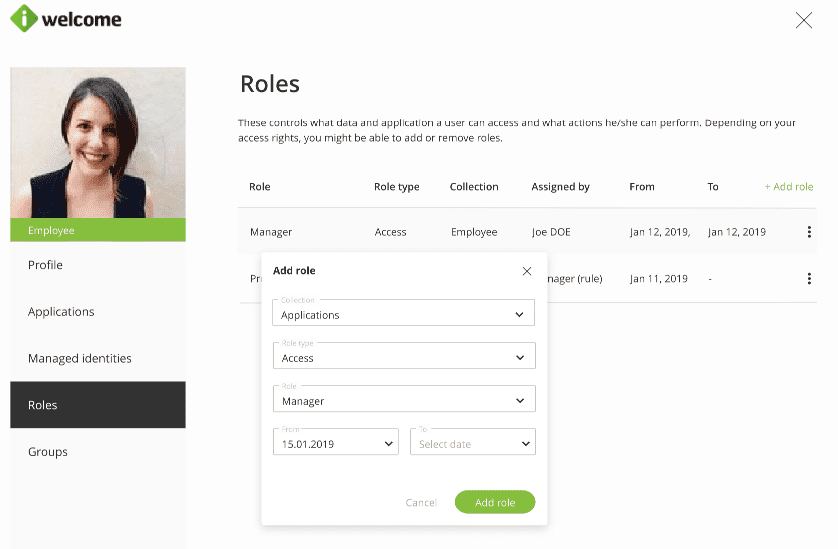
- Management of user roles, including the assignation of time-based roles. Assign user roles, controlling what data and applications a user can access and what actions he can perform. Optionally, you can set up an end date as well.
- Assignation of users to groups. Add users to groups for an easier organisation of identities.
Importing users
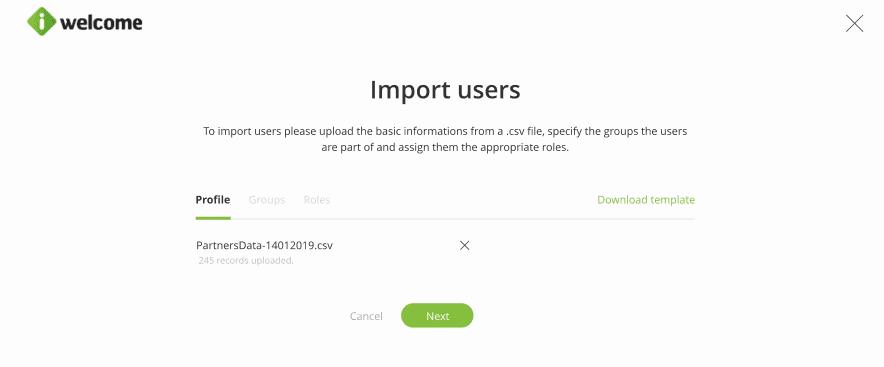
You can import a large volume of users at once into the system using a .csv file, using the template provided.
To import users, you first need to download the template we created and populate it with a list of users. Upload the file.
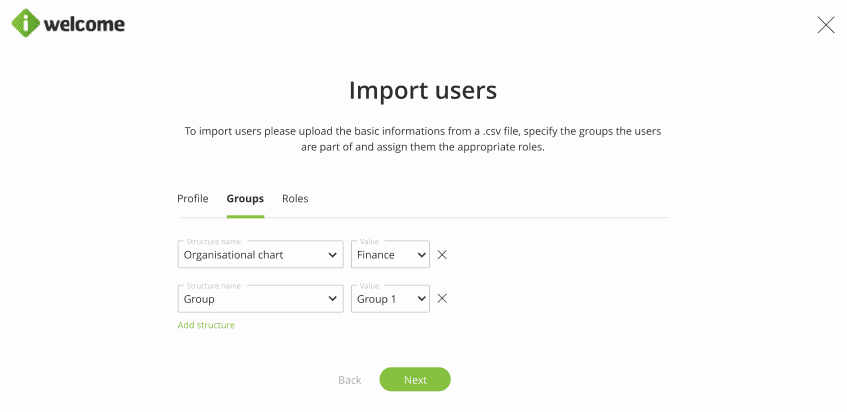
Once the file is uploaded, you can then move to the next step, which is specifying what structures the users belong to. Users can belong to multiple structures and groups at once. For example, a user can belong to the structure corresponding to the organisational chart and a certain user group at the same time.
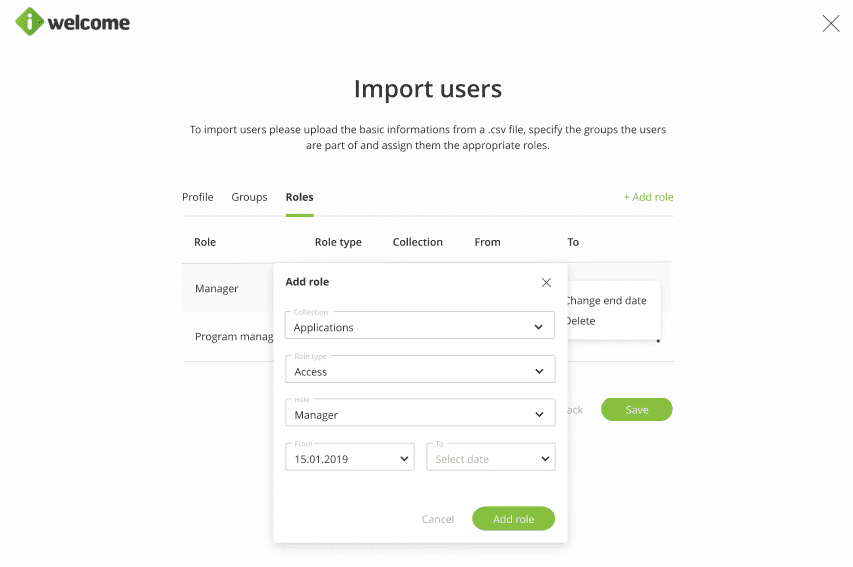
In addition to adding users to groups, you can also assign roles to them. When adding a new role to the list of users you are importing, you need to fill in the following information:
- Collection. Specify the collection that role belongs to.
- Role type. You can choose from the role types already set up for your organisation. Read more on roles.
- Role. Select the desired role from the role category.
- From. Define the starting date from which the imported users will have that role.
- To. Optionally, you can set an end date for the role.
Performing mass updates
Another tool for performing mass actions on a large number of users are mass updates. You can perform mass updates such as role, group or attribute value changes.
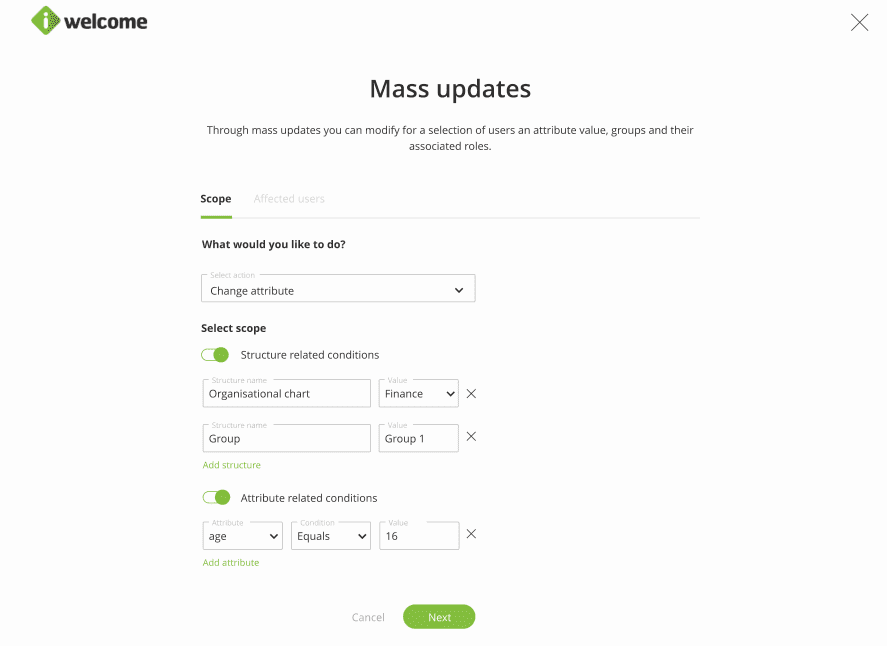
As an example, we will render inactive user accounts that belong to the Finance department and Group 1 (simultaneously), and who are aged 16.
Within the Scope tab, we will fill in the following information:
- Select action. Choose what the action should be. In our case, it is to change the attribute.
- Structure related conditions. Toggle the button if the desired update is related to structures.
- Structure name. Choose the structure where the user belongs. You can choose multiple structures. We will choose both Organisational chart and Group.
- Value. Choose the value for that selected structure. We will choose Finance and Group 1.
- Attribute related conditions. Toggle the button if you wish to add attribute related conditions as well.
- Attribute. Select what attribute will condition the mass update. We'll select age.
- Condition. What is the condition? In our case, it is Equals.
- Value. Choose the value necessary for the condition to be satisfied. We'll choose 16.
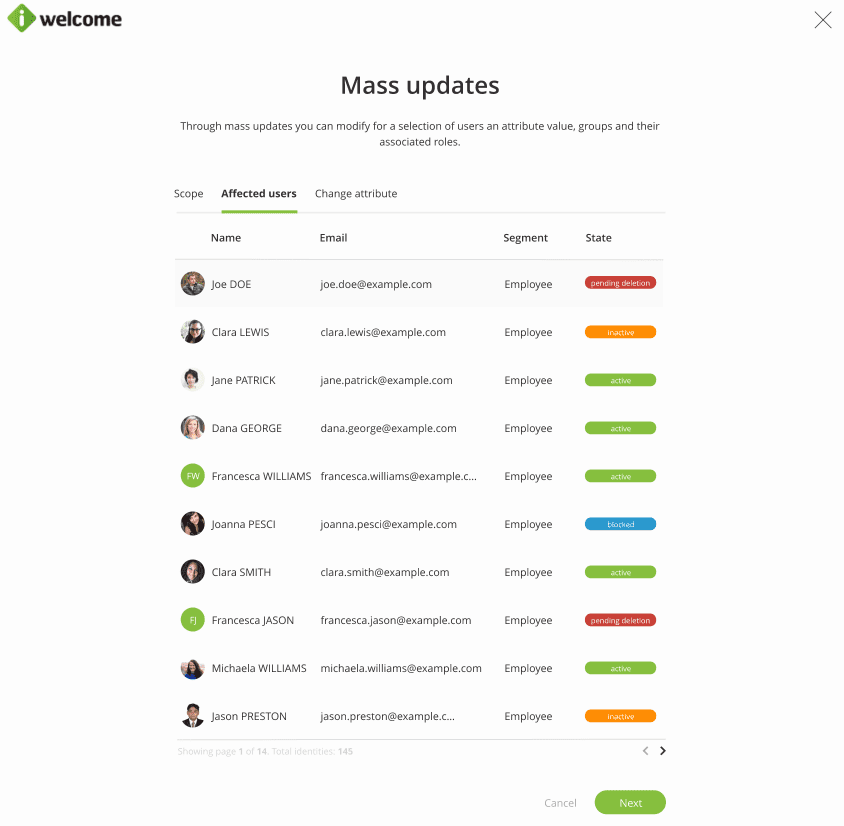
Next we'll get a list of all the users who will be affected by this update, together with information regarding their state and the segment they belong to.
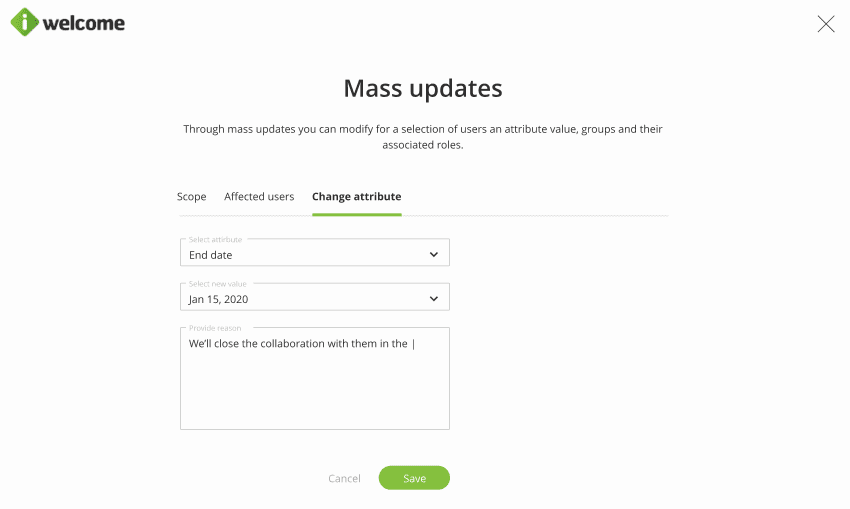
To perform the update, you'll need to:
- Select an attribute. What attribute will change.
- Select a new value. What will the attribute value change to.
- Provide a reason. Provide a brief explanation for the mass update.
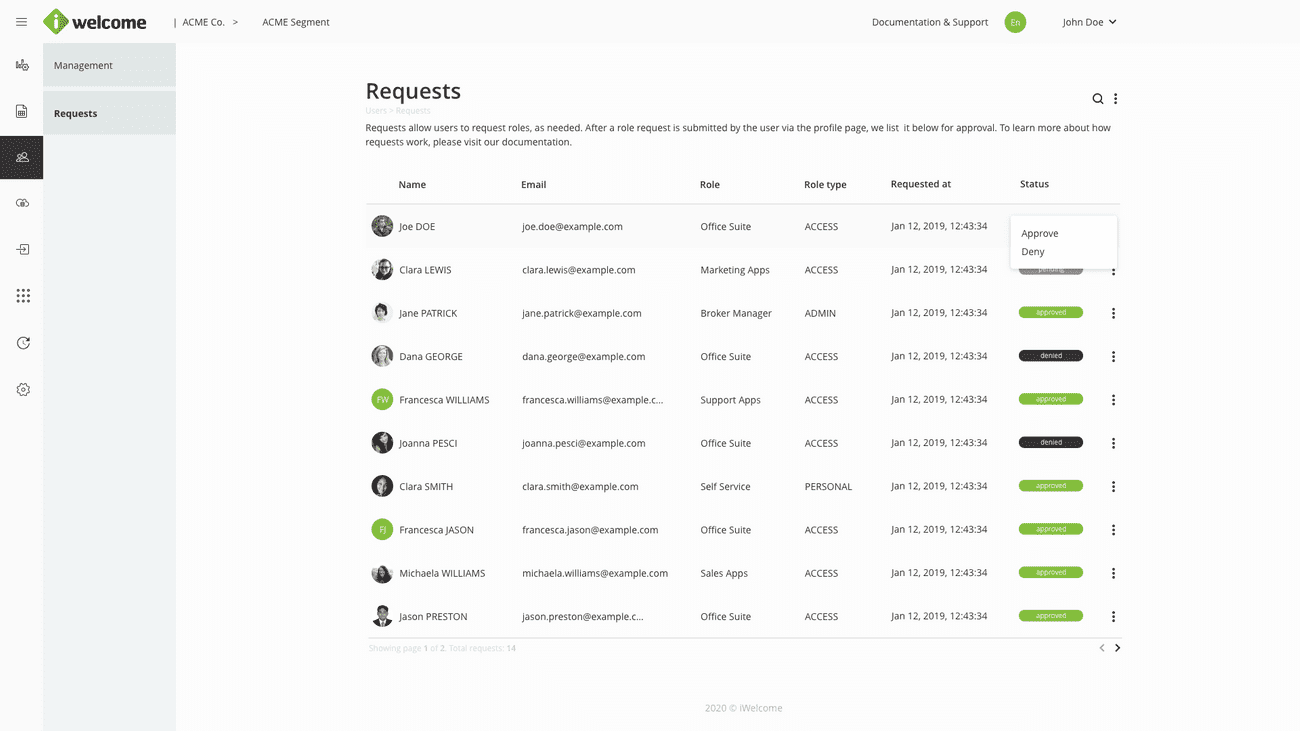
Requests
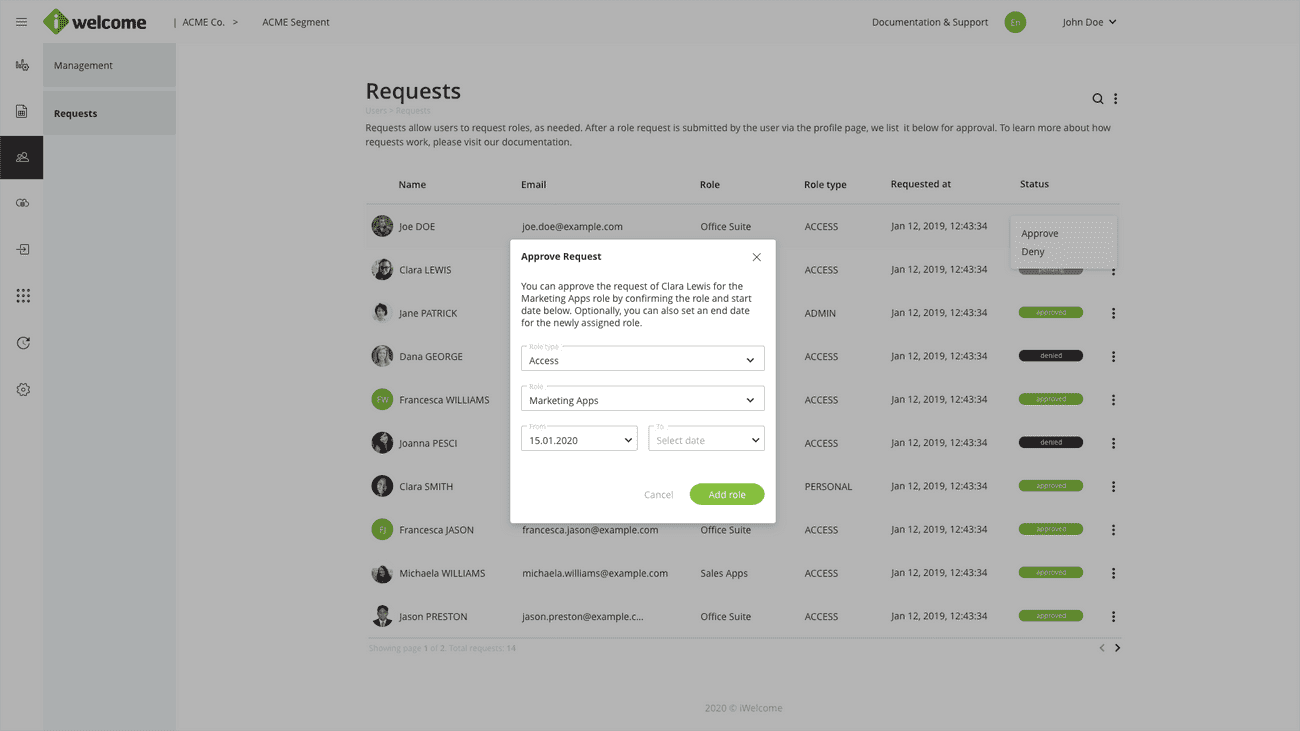
The Requests tab is where we gather all role requests submitted by users, together with information about the user who submitted the request, the role name and type he is requesting access to, the date it was submitted and the request's state.
Accessing requests
A user is only able to access the Requests menu item within the platform if that user has at least one Admin role that grants him that permission. Furthermore, users are only able to manage the requests submitted by their managed identities.
Managing requests
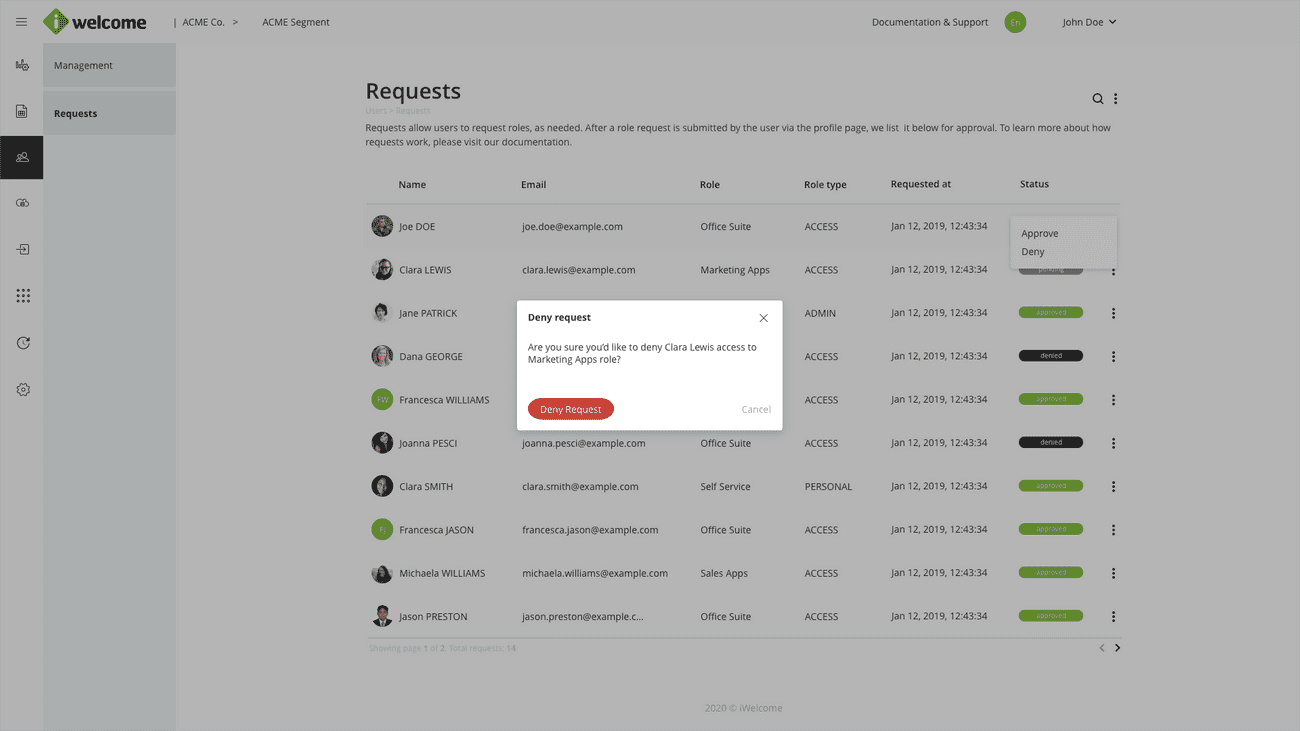
The available actions are:
- Deny. Denies the request and prevents any further actions to be performed on it.
- Approve. If you choose to approve a request, you'll need to confirm the role you are assigning to the user and choose a start date and optionally an end date to that role.